Welcome to the Hills
There is a particular kind of confidence that comes from standing on a mountain summit and knowing exactly how you got there and how you’re going to get down, not by following the crowd or relying on your phone signal, but by reading the ground, trusting your map and following your compass bearing through the mist.
The United Kingdom is home to some of the finest upland walking in the world. From the granite tors of Dartmoor to the knife-edge ridges of the Cuillin, from the rounded sleeping elephants of the Howgill Fells to the vast, high plateau of the Cairngorms each landscape has its own character, its own challenges and its own rewards. But all of them share one requirement: the walker who ventures into them must be able to navigate.
Navigation is not a gift that some people are born with and others are not. It is a practical skill, learned by doing, refined through practice and built one walk at a time. This guide covers some of the key navigation learnings a complete beginner needs to start that journey, from choosing the right map to working out a four and six-figure grid reference and understanding contour lines.
Over time we’ll be adding further blog posts looking at other elements of navigation in more detail so watch this space.

1. Why Navigation Matters
The British uplands can be an unforgiving environment for those who are unprepared. Weather in the hills can change with extraordinary speed, a clear morning summit can become shrouded in mist in minutes, and the warm sunshine of the valley can give way to driving rain and wind as you gain height.
Mobile phone signal, often taken for granted in everyday life, can be unreliable in upland areas. Popular map and navigation apps require either a signal to load map tiles or the foresight to have downloaded them in advance. Batteries drain faster in cold conditions. Touchscreens become unresponsive in wet gloves. In short, digital tools have their place, but they should form part of the navigator’s toolkit, not all of it.
Navigation skill is what allows you to move confidently through any of these conditions. It is the difference between a minor inconvenience and potentially a genuine emergency. It is also one of the most satisfying things to get right, there is real pleasure in following a compass bearing across featureless moorland and arriving exactly where you intended.
Beyond safety, good navigation and map skills open up the hills in a way that following waymarked paths never can. When you can read the ground and find your own line, you are free to explore the quieter corners, to take the route less walked and to experience the landscape on its own terms.

2. Choosing the Right Map
In the UK, the two main map publishers for hillwalking are Ordnance Survey (OS) and Harvey Maps. Both produce excellent products, but they are slightly different in style and form.
Ordnance Survey Maps
The Ordnance Survey (OS) is the UK’s mapping agency and has been around for a long time, approximately 280 odd years having been established for military purposes to map Scotland following the Jacobite rebellion in 1745. These maps are popular with outdoor enthusiasts, with the OS producing maps covering the country in a variety of scales including 1:50,000 and 1:25,000.
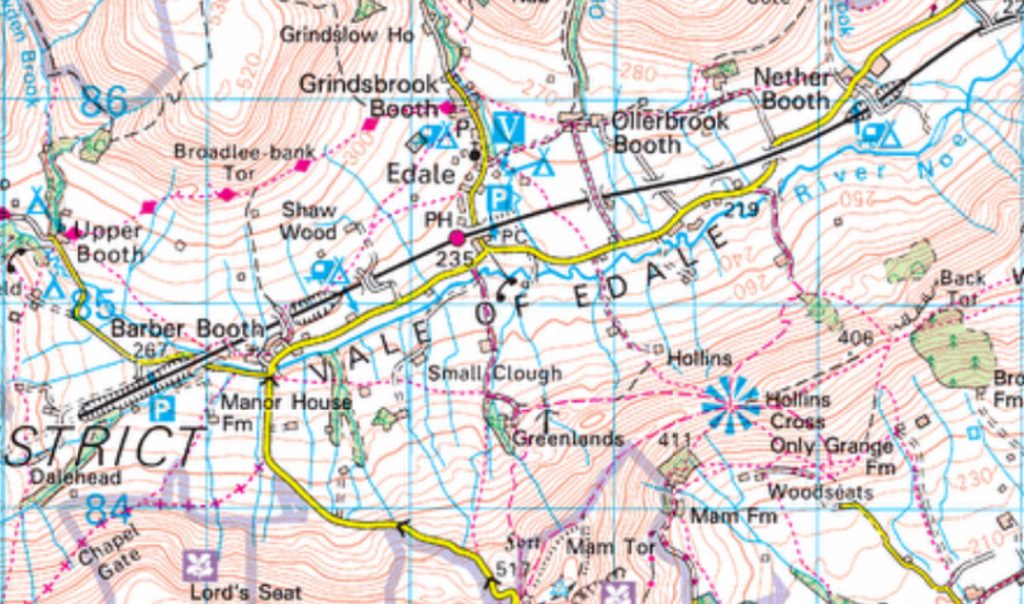
1:50,000 scale (Landranger series) — On these maps, 2 cm represents 1 km on the ground. They cover a larger area but with less detail than the 1:25,000 scale maps. This makes them particularly useful for planning routes over longer distances. While they don’t show every feature such as all walls, fences, vegetation types or smaller place names, some users find this beneficial because the reduced detail creates less clutter, making the map clearer and easier to read. This is especially so in certain landscapes, for example open moorland or in winter under snow for example. Users may find this scale of map (and the 1:40,000 Harvey Map) to be sufficient to identify significant footpaths, landscape relief and key features. Finally, it’s important to note that these maps are invariably printed on 1 side of the paper, whereas 1:25,000 maps (below) are often printed on both sides. This makes 1:50,000 maps slightly easier to handle when up in the hills where wind and rain can make this challenging.
Example of a 1:50,000 OS Landranger Map – “Edale Valley”
1:25,000 scale (Explorer series) — These maps are twice the scale of 1:50,000 maps, meaning 4 cm on the map represents 1 km on the ground. Because of the larger scale they show much more detail, including field boundaries, walls, fences, public footpaths, bridleways, access land, woodland boundaries and many smaller landscape features. This high level of detail makes them particularly useful for precise navigation and intricate map reading, especially in areas with complex terrain, dense path networks or limited visibility. However, the increased detail can sometimes make the map look busy or congested, which means users may need to spend a little more time interpreting the symbols and features.
Example of a 1:25,000 OS Explorer map – “Edale Valley”
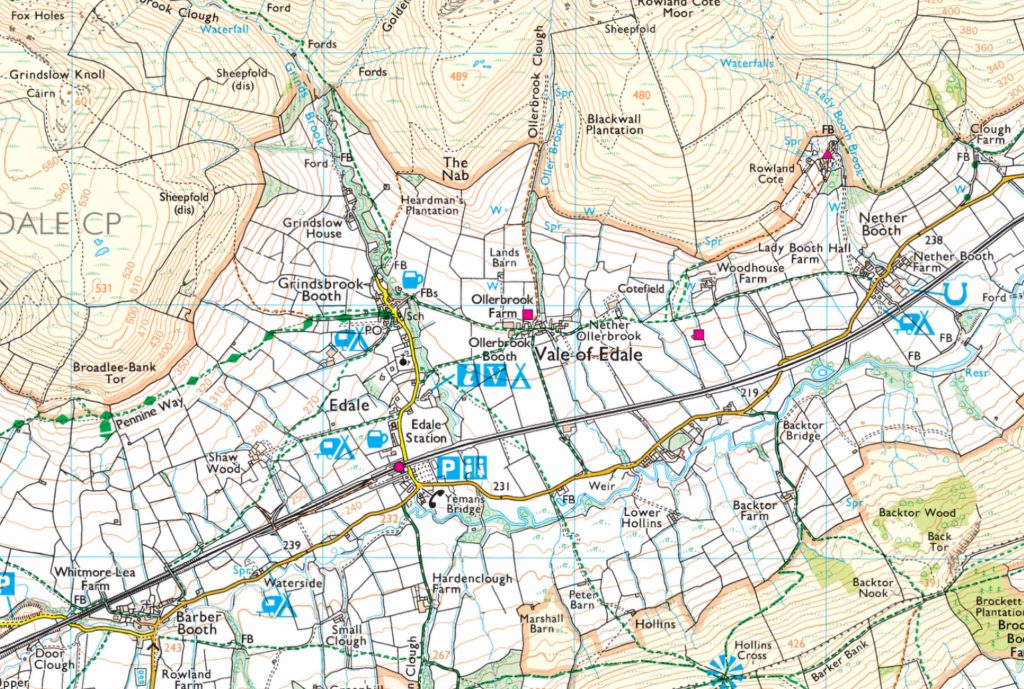
Overall, 1:25,000 maps are widely recommended for beginners, walkers and anyone navigating complex countryside, as they provide the most comprehensive representation of paths and landscape features.
Harvey Maps
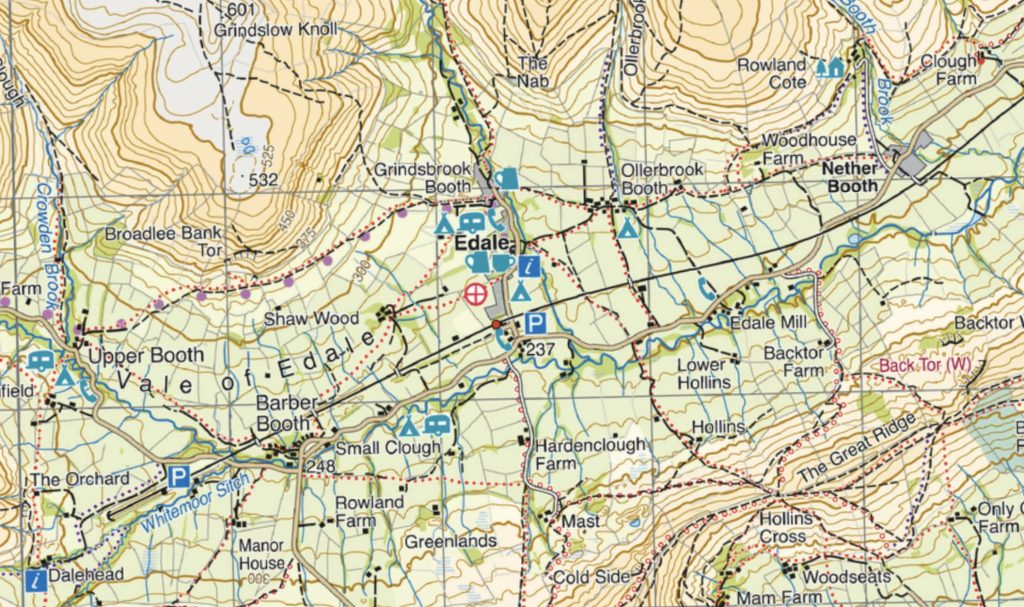
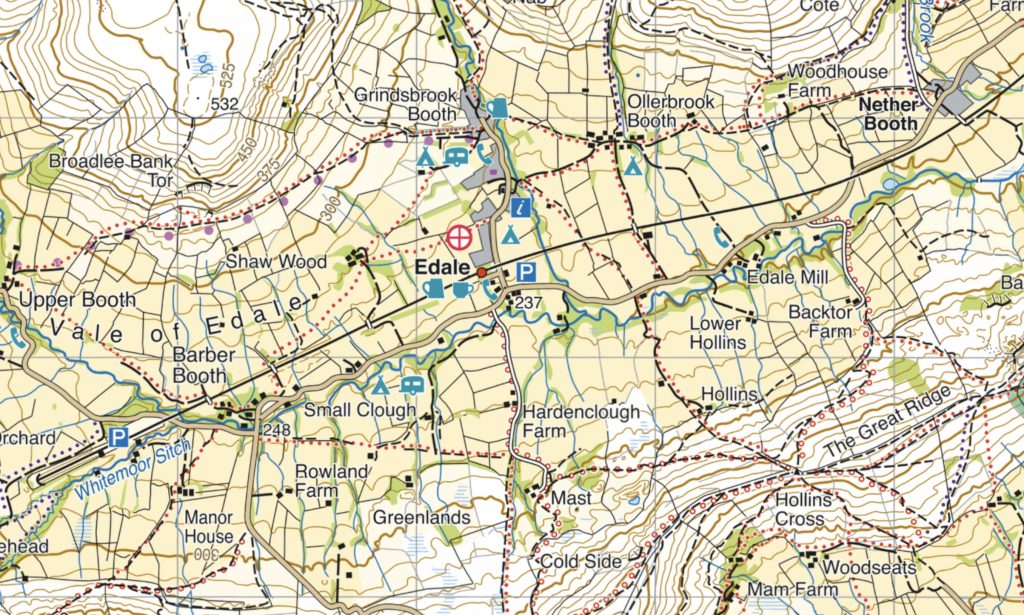
OS Explorer maps produced at 1:25,000 scale, provide a very high level of detail such as field boundaries, walls, fences and a full range of public rights of way. Harvey Maps are commonly produced at 1:40,000 scale for mountain and hill areas, although they also produce 1:25,000 Superwalker maps with large amounts of detail. A fantastic feature of Harvey Maps is that they‘re printed on waterproof paper and are usually more compact than OS maps making their handling much easier. Harvey maps are specifically designed for hillwalkers and mountaineers, so they re-prioritise some detail, through de-cluttering non-essential information like some small field boundaries for example. These maps instead emphasise terrain, contours and key upland features. They often use clearer contour shading, bold colouring and uncluttered design to make the shape of the land easier to interpret.
Example of a 1:40,000 Harvey Map – “Edale Valley”
Example of a 1:25,000 Harvey Map – “Edale Valley”.

Map Care
Whatever map you choose, it is no use to you if it’s a soggy, illegible mess when it rains. A waterproof map case (a clear plastic wallet with a closure) is an essential piece of kit and costs just a few pounds. Fold your map so that your intended area of travel is on the outside, slip it into the case, and hang it around your neck or clip it to your jacket. Some walkers prefer to laminate sections of their map or to buy the OS paper maps pre-laminated. Harvey Maps, being waterproof by design, need no additional protection.
3. Understanding Your Map – A Quick Guide
A topographic map is a truly amazing thing. It takes a three-dimensional landscape, mountains, valleys, ridges, cliffs, rivers, boggy ground and reduces it to a flat sheet of paper in a way that allows a trained eye to reconstruct the shape of the ground in vivid detail. Learning to read a map is like learning a new language, initially bewildering but rapidly rewarding once the basic vocabulary clicks into place.
Map Symbols
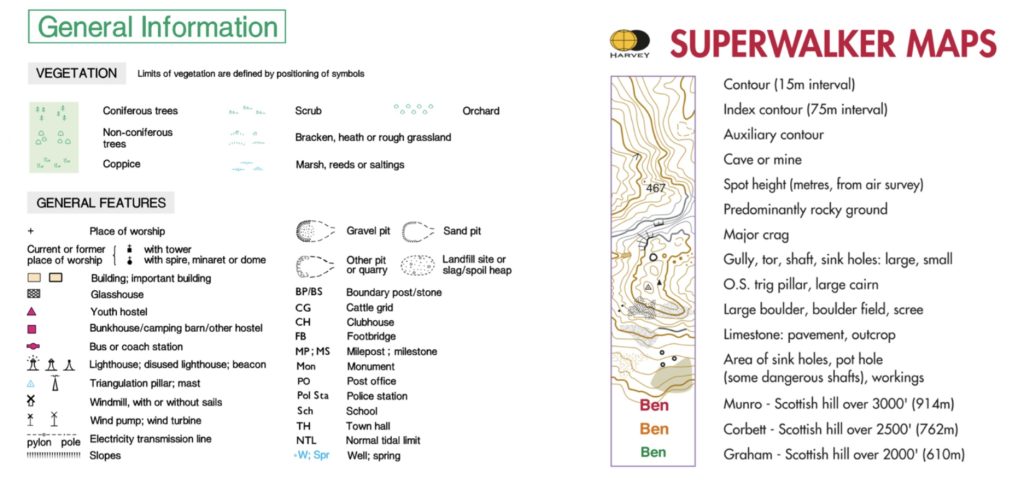
Every OS and Harvey map sheet includes a “legend”, a key to the symbols used on that map. It is well worth spending a bit of time studying the legend for your map before you set out. Key symbols to learn include: footpaths, bridleways, restricted byways, open access land, woodland, and crags (the stylised drawing of a cliff face).
Water features are shown in blue: lakes, reservoirs, rivers and streams of varying widths and boggy ground (a warning that the ground ahead may be slow and wet going). Buildings are shown with specific symbols for churches, pubs, youth hostels, campsites and other features of interest to the walker.
Extract from the legends of an OS 1:25,000 and Harvey 1:25,000 map are below.
The National Grid System
You’ll note on the example maps above that they are criss-crossed with a series of blue or gray lines forming a grid which overlays the map. These lines are part of the National Grid, a co-ordinated system developed by Ordnance Survey that divides the Great Britain into a series of measured squares.
The lines run North to South (Eastings) and East to West (Northings). Each side of the grid square on both OS and Harvey maps typically represents 1km. This grid creates a precise reference framework across the whole country allowing users to locate themselves on the map typically by using a 4 figure grid reference placing the navigator somewhere within the 1km square, or a 6 figure grid reference placing the navigator in a specific 100m area within the 1km larger square. We look at the basics of grid references later in this guide.
The maps grid system therefore provides a means of:
· Measuring or estimating distance on the map,
· It allows the navigator to locate themselves on the map; and
· Also provides a North reference for orientation and compass work.
Contour Lines
Contour lines are one of the most important features on any hillwalking map and the one that takes the most practice to read fluently. A contour line connects all the points on a map that are at the same height above sea level. On OS Explorer maps, contour lines typically drawn at every 5 or 10 metres of altitude depending on the terrain, with every fifth line (every 50 metres) drawn slightly thicker. These thicker lines are called index contours and are usually labelled with their height in metres. Harvey maps use 15 metres contours with every fifth contour being 75 metres.
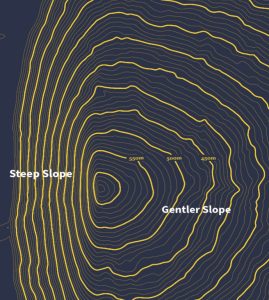
The key to reading contour lines is to remember that they tell you not just the shape of the land, but how steeply it rises or falls. Lines that are close together mean steep ground, there is larger change in height over a shorter horizontal distance. Lines that are far apart mean gentler ground.

Here’s how some key land features appear on maps.
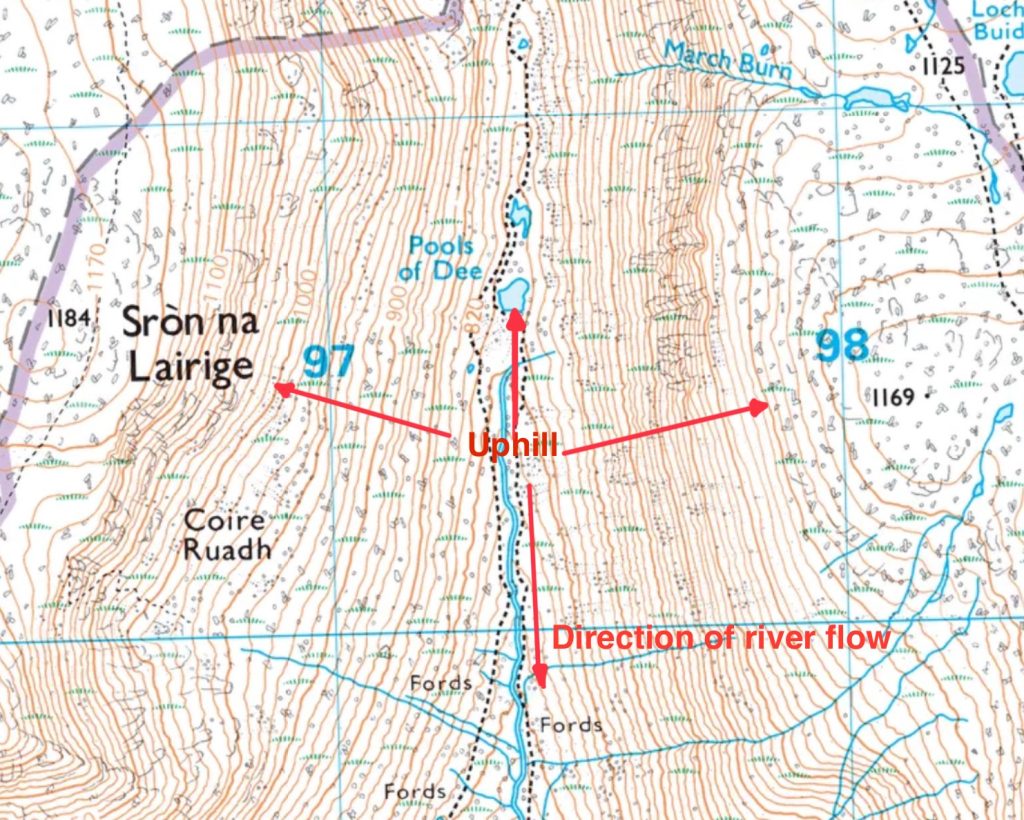
Example of the contours reading uphill (red text and arrow added).
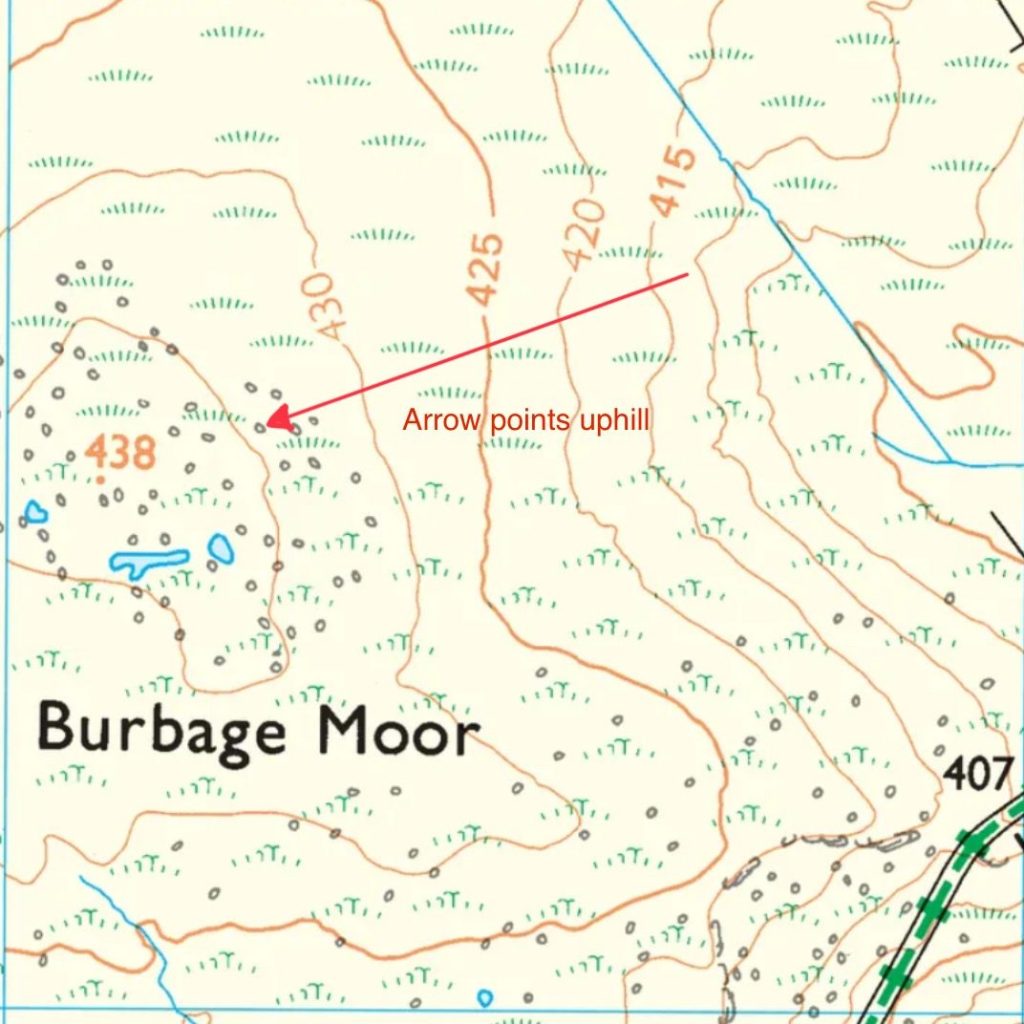
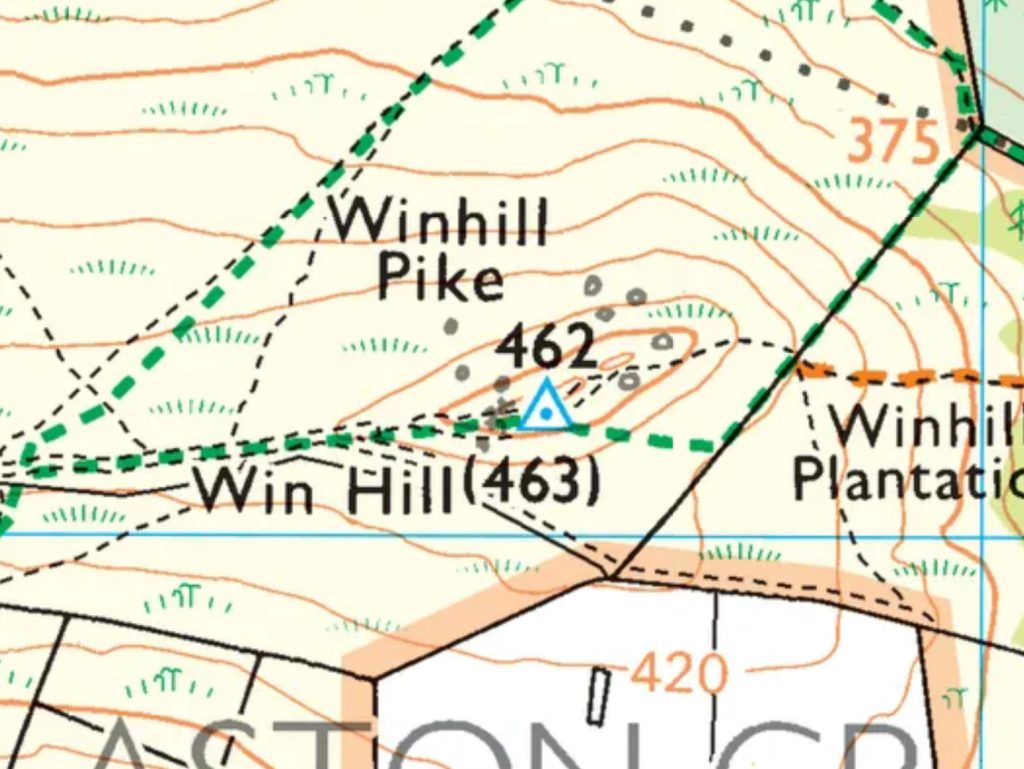
Mountain summits / hilltops / peaks — Shown by closed, roughly circular or oval contour lines that form concentric rings. The rings get smaller and tighter toward the centre (highest point). The innermost ring or a spot height dot/triangle with a number marks the exact summit.
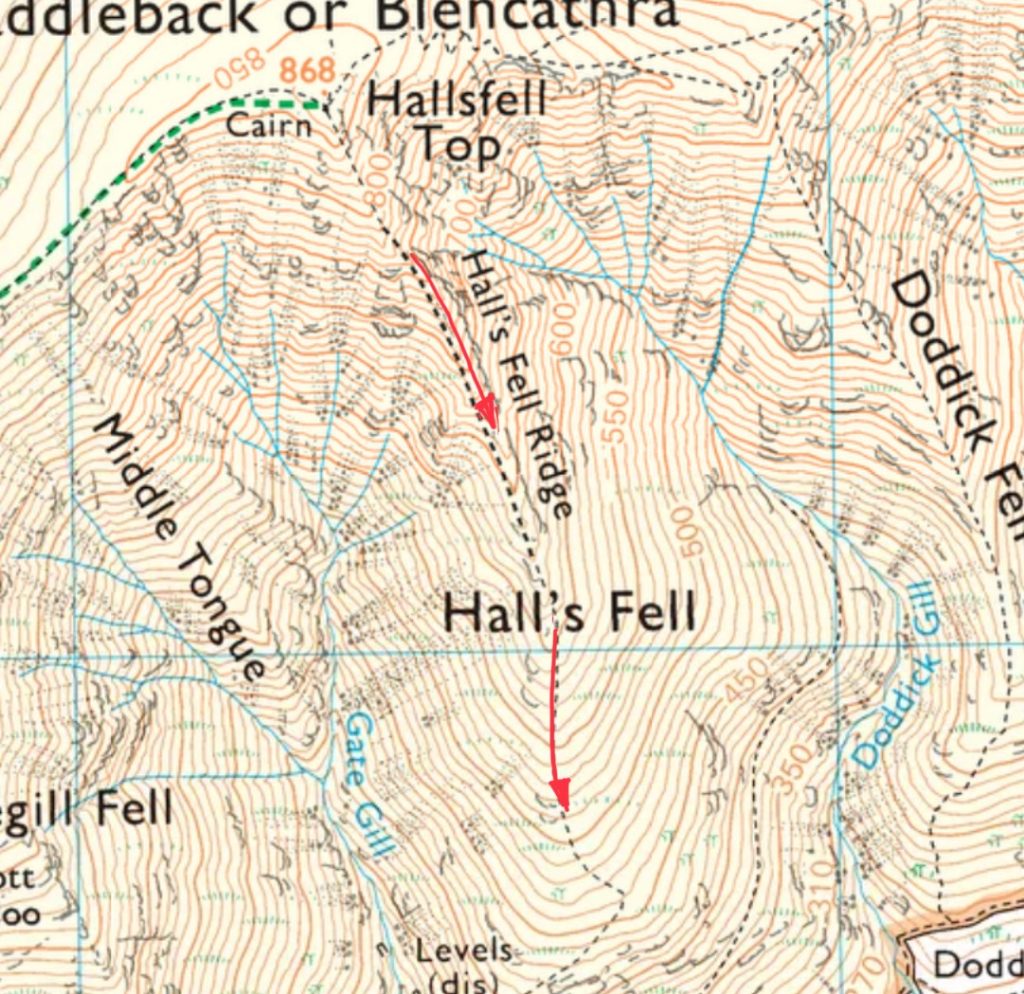
Ridges/Spurs — These are ridges or tongues of higher ground jutting out from a hill/mountain. Contours form V or U shapes pointing downhill (away from higher ground, see added red arrows).
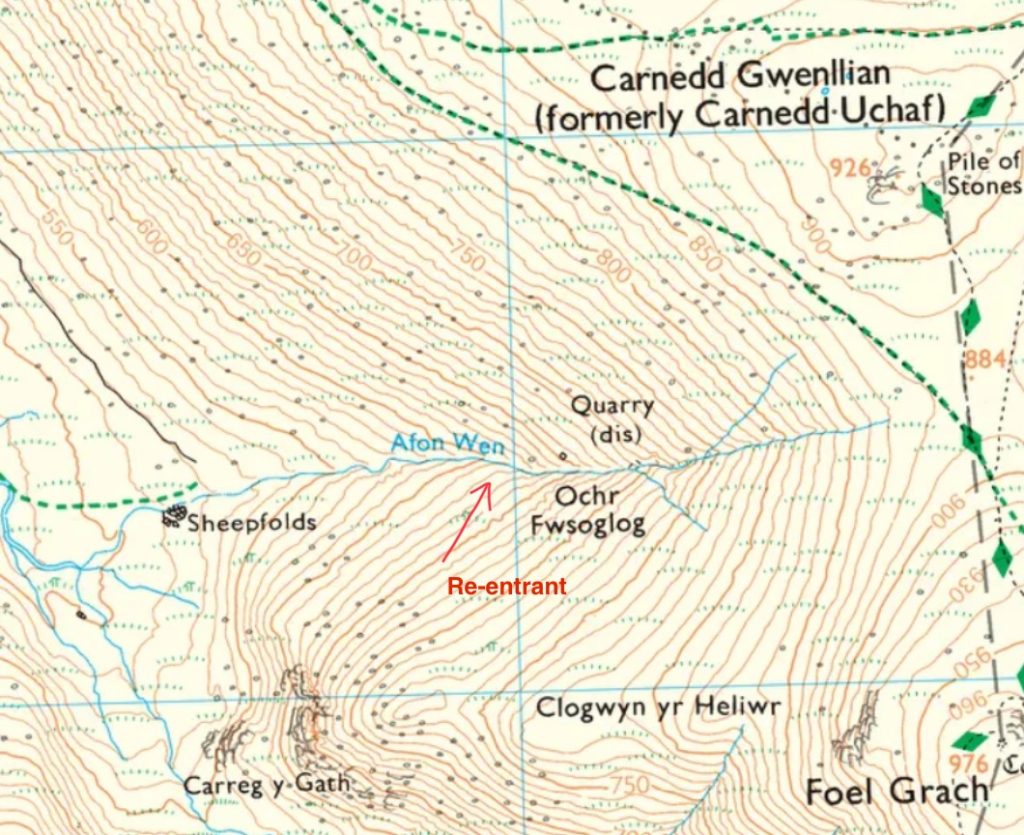
Re-entrants (small gullies/valleys) — Narrow indentations or small valleys cutting into a hillside, often between spurs or ridges. Contours form V or U shapes pointing uphill (into higher ground). The point of the V is toward the top of the feature. They often, but not always, hold streams.
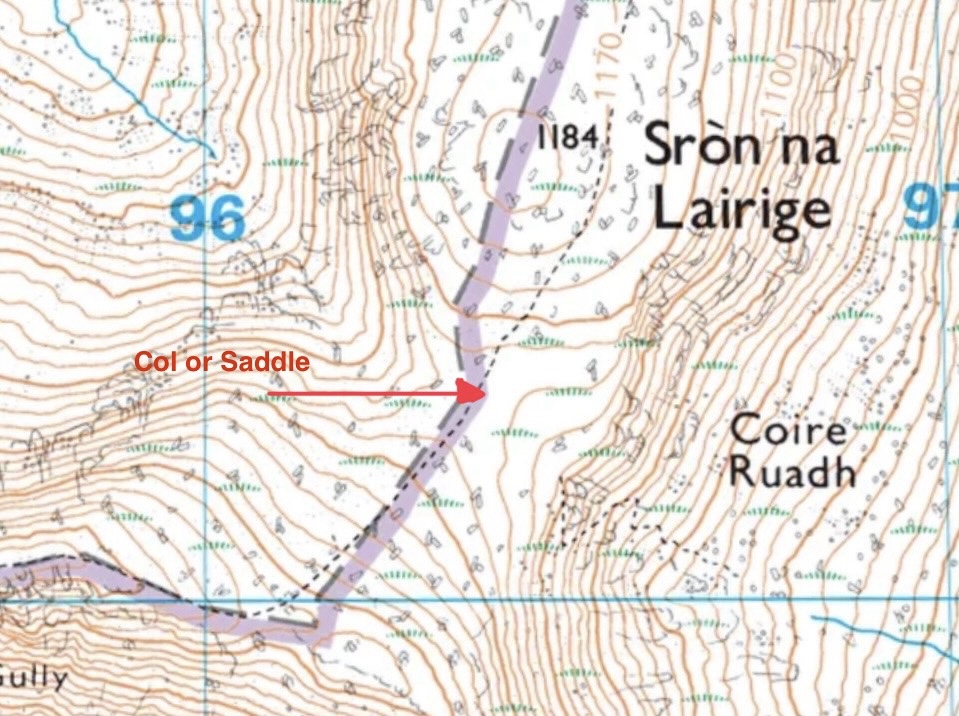
Cols / saddles — Low points or dips along a ridge between two higher summits (e.g. a mountain pass). Contours show a narrowing or “squeeze” where lines from opposite sides come close but don’t close fully, with higher contours on either side and lower in the middle. Sometimes marked by a low spot height.
River valleys — Larger, broader features where contours form V- or U-shapes pointing uphill (toward the headwaters/source). The point of the V faces uphill, and a blue river/stream symbol usually runs along the bottom. Contours are more widely spaced in flatter valley floors and tighter on steeper sides. Major rivers often create deep, parallel V-indents.
Flat areas (plateaus, broad valley floors, coastal plains) — Very widely spaced contours, or very few/no contours over large areas, indicating little change in height (gentle or level ground). In truly flat spots, contours may be absent or extremely far apart.
Mastering these patterns lets you visualise the 3D landscape from a 2D map!

4. Orienting Your Map
A map is only useful if it is correctly oriented that is, turned so that north on the map points to north in the real world, and the features shown on the map are in the same relative positions as the features you can see around you. An un-oriented map is like a sat-nav that doesn’t know which direction you’re facing: technically it contains all the information you need, but in practice it is deeply confusing to use.
There are two methods for orienting a map: by eye using landmarks and by compass. Both are valuable, and a good navigator will often use them together. In our next blog post we’ll look at using a compass in more detail, including using one to orient the map.
Orienting by Eye
If you can see prominent features around you and know roughly where you are, orienting the map by eye is quick and intuitive. Identify a major feature on the landscape such as a summit, reservoir, ridge or tree line and locate it on your map. Rotate the map until the feature on the map points in the same direction as the feature on the ground.
Once one feature is aligned, check a second feature in a different direction to confirm. If it also lines up, your map is correctly oriented. Additional features can provide further confirmation.
This method requires a reasonably clear idea of your location and what you are looking at. In good visibility on familiar terrain, it is the fastest and most natural approach. In poor visibility, or where features are difficult to distinguish, a compass is necessary.

5. How to Work Out a Grid Reference
One of the most practically useful map skills is the ability to give and receive a grid reference, a simple numerical code that identifies any location on a map to within a square kilometre, 100 metres, or even 10 metres, depending on how many digits you use. Grid references are used when calling mountain rescue, communicating a meeting point, recording a waypoint, planning routes or using a GPS or smartphone to navigate to a specific location.
OS maps are overlaid with a grid of blue lines and Havey maps are gray. This grid foms a pattern of squares. Each line is labelled with a two-digit number. The vertical lines, running north–south, are called Eastings (because their number increases as you move East). The horizontal lines, running east–west, are called Northings (because their number increases as you move North).
The Golden Rule: Along the Corridor, Then Up the Stairs
The single most important thing to remember about reading grid references is the order in which you read the numbers. You always read Eastings first (the number along the bottom of the map), then Northings (the number up the side).
A helpful memory aid used by navigators and taught on Seven Hills Outdoors courses is: “Along the corridor, then up the stairs” — you walk along a corridor before you climb the stairs, so you read the Easting (across) before the Northing (up).
Four-Figure Grid References
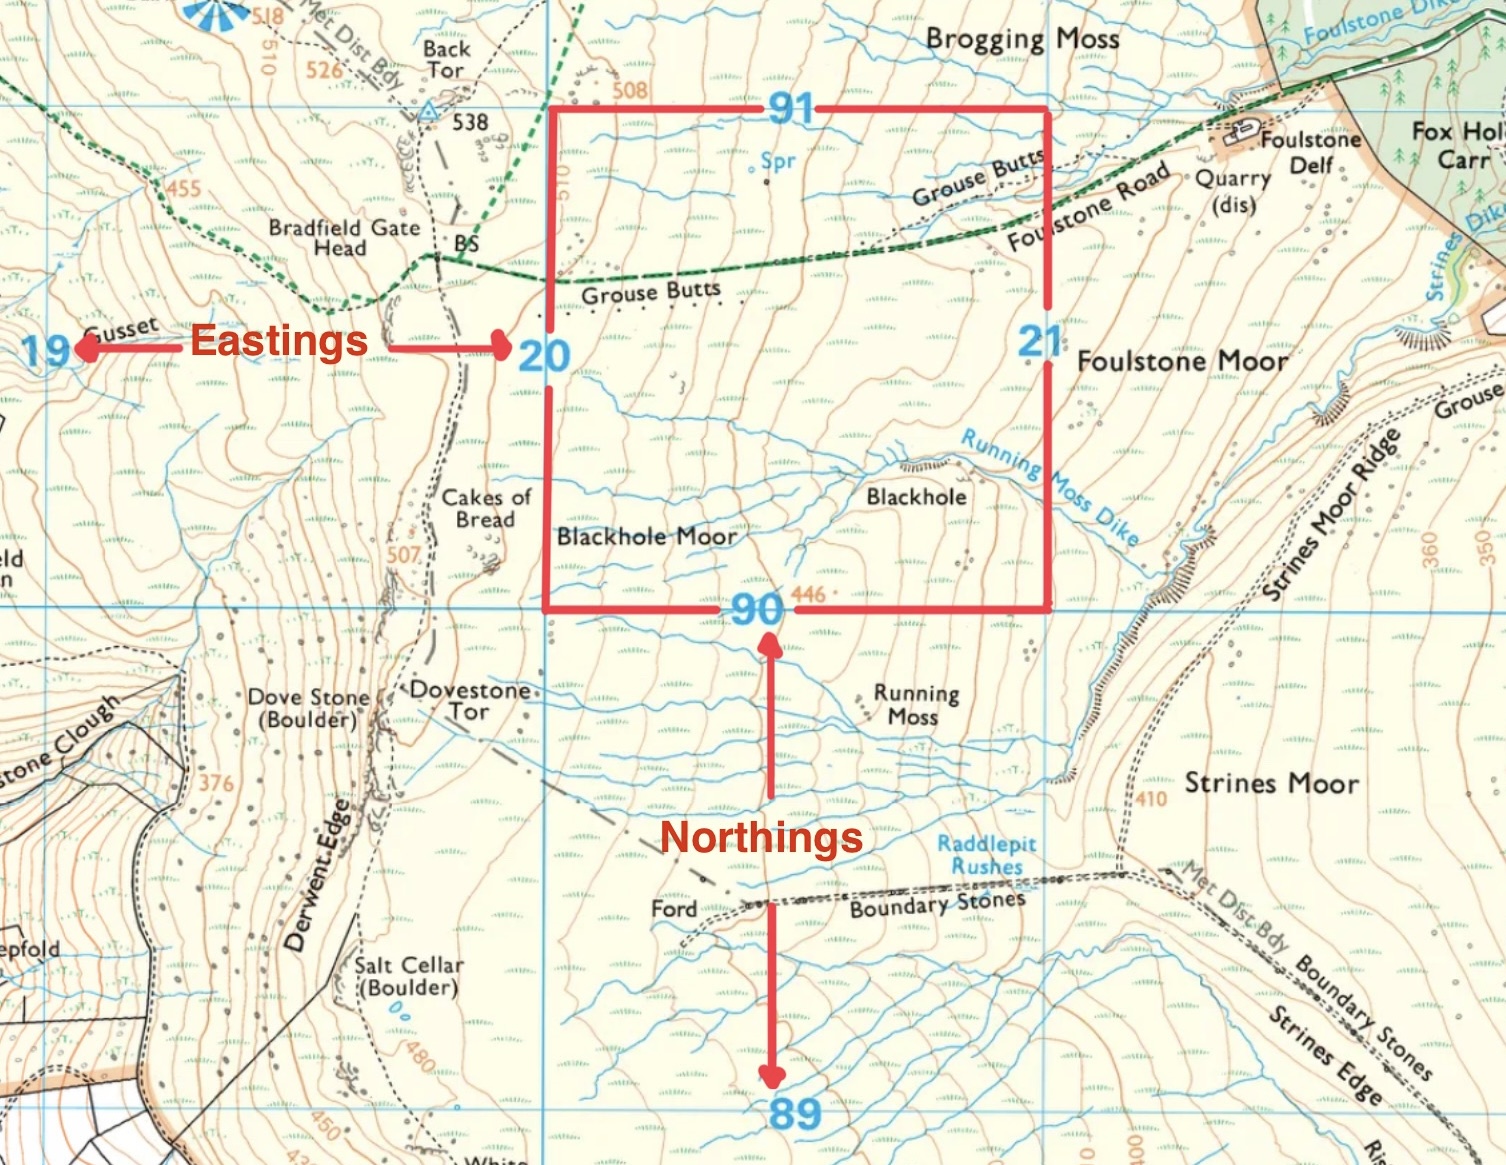
A four-figure grid reference identifies a 1km x 1km square on the map. It is formed by taking the two-digit Easting of the grid line on the left side of the square, followed by the two-digit Northing of the grid line on the bottom of the square. For example, the reference 2090 would place you in the red 1km square. The left edge is grid line 20 (Easting) and the bottom edge is grid line 90 (Northing). A four-figure reference is useful for general location by giving an area you are in, or a large feature such as a reservoir or summit. It is not precise enough for pinpointing a specific location.
Six-Figure Grid References
A six-figure grid reference narrows the location down to a 100m x 100m square, roughly the size of a football pitch, and is the standard reference used in hillwalking and by mountain rescue teams. To achieve this precision, you mentally divide each 1km grid square into ten equal strips, both across and up, creating a 10×10 grid of 100m squares within the larger square.
The process is as follows:
So, for a feature that is seven-tenths of the way across and four-tenths of the way up the square 2090, the six-figure reference would be 207904. In full, with the two-letter national grid prefix (which identifies the 100km square you are in), a complete reference might look like SK207904. In this case the SK prefix is the primary identifier of the 100km x 100km grid square covering the Central and Eastern Peak District.

6. Using Your Phone Wisely
The explosion of GPS enabled mapping apps for smartphones has transformed the way many people navigate in the hills. Apps like OS Maps, Outdoor Active, ViewRanger and Komoot allow you to carry a detailed digital map at all times, see your current position on it in real time, record tracks, plan routes and share your location with others. Used intelligently they are genuinely useful tools but they are prone to a set of failure modes that make them dangerous when relied upon as a primary navigation method.
The Limitations of Phone Navigation
• Battery life — smartphone batteries drain significantly faster in cold conditions and a full day in the hills can exhaust even a healthy battery. GPS is one of the most power hungry functions on a phone.
• Screen readability — in bright sunlight, touchscreens can become almost impossible to read. In rain and wind, operating a touchscreen with wet fingers or gloves is deeply frustrating. Water can trigger false inputs on some devices and on occasion you may struggle to open the phone.
• GPS accuracy — while generally excellent, GPS accuracy can be degraded in deep valleys, under heavy tree cover or in certain atmospheric conditions. The stated accuracy of a phone GPS (typically 3–5 metres in good conditions) assumes a clear sky view.
• Map tile availability — if you have not downloaded offline maps before your walk, you will find the app attempting to load tiles over a mobile network that may not exist where you are. Always download the offline map for your area before leaving home.
• Device fragility — phones are not designed for mountain environments. A cracked screen, water ingress or a drop onto rock can render the device useless.
Best Practice
The sensible (and real world) approach and the one taught consistently on Seven Hills Outdoors courses is to treat your phone as a useful and convenient backup to traditional map and compass navigation, not as a replacement for it. Carry your paper map. Know how to take a compass bearing. Use the app to track your progress, check your position when you are confident and as a first resource if you become uncertain. Carry a portable battery pack to extend your phone’s life, always have the offline map downloaded and keep the device in a waterproof case or bag.

Taking Your Skills Further
Everything in this guide is a starting point, not an endpoint. In the next blog post we’ll look at compasses, bearings and navigation strategies amongst other things but it’s important to remember that navigation is a skill that deepens with every walk, every piece of new terrain and every moment of uncertainty successfully resolved. The most experienced navigators in the UK including mountain guides, search and rescue team members, mountain marathon competitors will all tell you that they are still learning, still refining, still discovering new subtleties in the relationship between the map and the ground.
What moves you along the learning curve most rapidly is not reading about navigation but doing it, getting out in the hills with map and compass, making decisions, occasionally getting things slightly wrong, working out why and improving. And there is no better accelerant to that process than structured learning with a qualified instructor.
The National Navigation Award Scheme (NNAS)
The National Navigation Award Scheme provides a structured, progressive framework for developing navigation skills across three levels: Bronze (beginners), Silver (intermediate), and Gold (advanced).
Seven Hills Outdoors are an approved NNAS provider and run Bronze and Silver navigation courses in the Peak District. The Bronze award covers all the foundational skills described in this guide and the assessment (a short navigation exercise in the field) gives you an objective confirmation of your competence.
What Seven Hills Outdoors Offer
Seven Hills Outdoors provide a full progression of navigation and mountain skills courses, designed for walkers at every stage of their development:
• Beginners Navigation Course Peak District — ideal for complete beginners, covering map reading, compass basics, and simple navigation techniques in the Peak District.
• Intermediate and Advanced Navigation Skills — more comprehensive course building from basics through to compass bearings, relocation and challenging terrain navigation.
• NNAS Bronze Award (2 days) — covering the full Bronze syllabus with assessment.
• NNAS Silver Award (2 days) — for walkers with solid foundational skills ready to develop more advanced techniques.
• Night Navigation Workshops. Having the ability to navigate in reduced visibility and at night is incredibly empowering (and fun!).
• Bespoke Navigation Days — for groups, clubs or individuals who want a tailored navigation experience.
All courses run with small groups and are led by qualified, experienced Mountain Leaders. Courses run in the Peak District, Lake District, Yorkshire Dales and Snowdonia.

The hills are waiting.
